
Recommended Stuff

Recent
Recent blog posts
- Five perhaps not-so-known PHP tricks for leaner and cleaner code
- PHPEclipse and PDT
- Kilowatts & Vanek are back, better than ever
- The future of my phpBB templates
- Checking in
- Web Design or the Art and Science of Solving Problems (Part 1)
- Lost in thought
- An easy way to display a customized menu in your Drupal theme
- Back on the blog with a CSS rant
- Eternal* fame on the red planet for free
Search this site with Google
Watermarking your graphics
Applies to: Fireworks 3 and up
This tutorial was originally published in 2003 at forumimages.com which was then run and managed by Daz.
Introduction
There are plenty of situations when you want to show someone your work done in Fireworks (or any other graphics application) yet not risk your work being plagiarized before youve published it. I will in this tutorial describe a method how to add so called watermarks to your images in Fireworks. Before you start make sure the Properties and Tools toolbars are visible. If they are not, select the Window menu and select Properties and Tools to make them visible. Some of the images in this article have been shrunk to save screen space but you can click them to see them full size.Tutorial
- Before we begin you will need something to watermark, it can either be graphics designed in Fireworks or any other application. Fireworks can read most common image file formats, however Photoshop PSD and Paint Shop Pro files will have to saved as JPEG, PNG or BMP before opened in Fireworks. I will use a design Ive made for the Swedish phpBB support site (phpbb-se.com) as example.
- Now that you know what image to watermark, lets create the actual watermark. Start by clicking File -> New in Fireworks. Set width to 400 pixels and height to 32 pixels. As canvas color, click Custom and pick black (see the picture A). You should now have an empty image, just like in picture B.
 Pic A
Pic A Pic B
Pic B - Use the text tool (see pic C) and click inside the empty image. Choose a font you like. Use white or black as font color. This depends on characteristics of the image you intend to watermark, if its dark, use white text and vice versa. Click the small square beside to the right of the font size droplist the properties panel (if you cant see it, select Window -> Properties) to select the fill color of the text. Select a font, size and kerning of the text so that it covers the whole width of the image. If it doesnt cover it all, move it to the center, you could also adjust the canvas size to adjust it to your text (Modify -> Canvas -> Canvas Size).
 Pic C
Pic C - If all is working as planned you should now have an image similar to the one in picture D. Now, select Modify -> Canvas -> Canvas Color, and make the canvas transparent (see picture E).
 Pic D
Pic D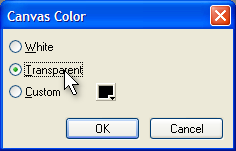 Pic E
Pic E - Select File -> Save as, find the folder you installed Fireworks to, open the Configuration folder and the Patterns folder inside it. Save your image there, name it watermark.png or copyright.png, the name doesnt matter just make sure you remember it. By saving it in the Patterns folder it will automatically be available in the patterns fill list. Hang on and well show you.
- You may need to restart Fireworks for it to recognize your newly added pattern. I suggest you do it to be sure. Open (File -> Open) the image you want to apply the watermark to. Start by creating a new layer by selecting Edit > Insert -> Layer. Use the rectangle tool (see picture F) to draw a big rectangle that covers the whole image, it doesnt matter if it overlaps. In the Properties panel click the droplist second next to the paint bucket icon and select Pattern. The rectangle will now be filled with the first pattern in the list but thats not what we want, so you will need to pick the pattern your created. Click the small box left to the fill type droplist and choose your pattern from the list. The pattern will have the same name as the file, the PNG file extension omitted. Ta da!
 Pic F
Pic F - Have a closer look, it doesnt really look like semi-transparent watermark, does it? No, you need to change the opacity of the rectangle first. Fireworks allows you to set the opacity with the opacity input box, see picture G. Click the small button with the arrow pointing down to show the slider, or set the opacity value by entering it manually.
 Pic G
Pic G - And voilá, almost done! That was pretty easy, wasnt it? If you want to skew the pattern, you can do so by pulling the directional handles. I didnt skew mine, you can see the final result in picture H.
 Pic H
Pic H
[adsense:300x250:1:1]
- You can now save the image as a PNG file and continue working with it in Photoshop and Paint Shop Pro or you can slice it and export it as any format youd like.
- Remember not to send the PNG file saved with Fireworks as any person can then open it and simply delete your watermark layer, you must flatten it which means merging all layers. Slicing and exporting or opening and saving it with another graphics editing software will achieve that.
- The Fireworks manual covers slicing in great detail and the chapter Slices, Rollovers and Hotspots will answer most of your questions.


